Saturday, January 25, 2014

Making Samples for Retail Products: What's the Point?

Over the last month, I've been testing out samples I bought from wool suppliers in Japan who imported it from New Zealand. As with any new product in retail, it's important for the company to invest some measure of time and money to see if the new product fits with the company's mission, values, and quality. Really, this is the time to run the product through the ringer and not overlook glaring mistakes because you like the price. A price of $30/kg for 21 micron merino wool might sound amazing, but at what cost? Meh, so it has a slight odor. Well, the combs caused nepps to form. There's an occasional oil stain from the machine. Would you accept these flaws as a consumer? Unlikely. But this isn't a discussion about the types of problems to look for, but more of a list of things look for with a critical eye under normal circumstances.

I know many of you also sample your yarns before you begin projects, whether it's for knitting, crocheting, or weaving. But it also makes sense to sample your fibers before spinning. More importantly, it's wise to do your sampling before dyeing and after dyeing, just to see how well a fiber itself holds up to the dyeing process. Now, this isn't a task you must do before you sell everything, but if you're trying to narrow down products (like I am) and choose your suppliers wisely, this scrutiny will give you bountiful insight.

Assorted White Merino Wool: 19-20 micron, 20.6-22 micron, 23-24 micron
I'd like to say first off that most of the samples I purchased I love, though I don't hold each sample to the same criteria. For example, I love the 22 micron dark merino wool (pictured below) sample I bought because it has a deep rich color and is quite soft. But it isn't nearly as soft as the 19 micron white merino sample I bought. But I feel like I'm comparing apples to oranges here, and in reality, it'd be better to make relative comparisons and follow that up with what I need for my business.

Dark Colored Merino Wool: 22 micron
As you can see in the following picture, it's difficult to tell that this sample was dyed. The dark color, by nature, will prevent much of the absorbed dye color from being seen. However, the natural colored merino adds a deep richness to these yellows and reds that aren't visible on the light colored merino or the white merino samples. Both of these pictures were taken with the same lighting and approximately the same angle.

Dark Colored Merino Wool: 22 micron, dyed with food coloring
In each category of sample, I ordered 100g each for testing purposes. That would allow me to reserve a portion of the undyed material to keep some of it unspun (so I can refer to it later) and spin up some undyed fiber, and dye and spin the remainder. Why do you want to go the extra mile and spin up undyed fiber? Besides the fact that it provides instant gratification, it shows you how the wool comes directly from the manufacturer. How does it feel? What does it smell like? Is it sticky? Does it spin smoothly? If you go straight into dyeing, you may never know what the wool was like fresh off the machine.

Light Colored Merino Wool: 22 micron
In all cases of sampling, be aware that you are at best seeing a tiny fraction of the company's regular output. It's entirely possible that you were given a superb sample, or a not-so-good sample. Rarely are companies in the fiber arts industry malicious, so if you do receive poor samples, phone the company and explain what the problem is. Accidents happen. More than likely, if you're happy with the samples you have, you'll be happy with the full size amounts--afterall, buying a bump of 30 pounds of merino isn't something you should buy if you aren't happy!

Light Colored Merino Wool: 22 micron, dyed with food coloring
But what else does sampling tell you about the wool that you won't get from the company's website? If you're also a dyer, whether casually or professionally, there are some things you'll want to consider about a product. How thick is the wool top or roving? Is it particularly dense? If so, you may have difficulties getting dye to penetrate to the center of thick top if you plan to hand paint it. Dense top may appear felted after dyeing (which is alarming!), and may require an extra step to fluff it up again before you use it/sell it. These are important things to notice so you can make appropriate considerations before purchasing in bulk.

White Merino Wool: 23-24 micron, dyed with food coloring
Learn a little about the wool you'd like to test before you buy it, especially if it's a rare breed or a colored sheep. Did you know that colored merino sheep will sometimes have kemp fibers? I learned this trivial fact a few years ago when I was learning about the main 70-80 sheep breeds commonly used in the US. I had completely forgotten about it when I receive my colored merino wool samples. Every once in a while as I was spinning, I found a kemp fiber and had to remove it. If I hadn't realized that kemp hairs were occasionally present in colored merino wool, I would have thought that I was given a mixed sample or some other sheep fiber.

White Merino Wool: 20.6-22 micron, dyed with food coloring
There's no better way to become intimate with a future product than working with it personally. Sometimes the main point of sampling for retail products is to know the product inside and out. I can tell you after using the colored merino samples, I feel like they would make excellent sock yarn, but wouldn't make the best lace garments. Why? Well, since I haven't observed the scales of the fiber under a scanning electron microscope, I can only offer a feeling; the 22 micron colored merino feels ever-so-slightly coarser than the 22 micron white merino. I also spun a lace weight yarn from both categories, and the colored merino didn't bloom nearly as much as the white merino did after washing and setting. This suggests that the amount of crimp in the white merino wool is slightly higher than the crimp in the colored merino. It also indicates that the white merino is probably softer than the colored merino.

Medium Dark Colored Merino Wool: 22 micron, dyed with food coloring
At this point, I only have the start-up capital to fund equipment, dye, and one type of fiber. I decided to go with the 21 micron white merino wool first because it is more versatile for dyeing than the colored wools. Sometimes you have to make tough decisions like this, no matter which scale you're working on. If you're running a business, the plan is usually to grow and expand with new products. Since I've already done the testing phase of several fibers, I can add them into my business plan as I see fit. The same applies to hobbyists. Having already tested out various fibers from various companies, you know which one to go to to get exactly what you need for any project.

White Merino Wool: 19-20 micron, dyed with food coloring
My personal insights from this testing phase are similar to my previous testing phases (this is the third major testing phase I've done in 12 months). Most of the time, fiber is fiber--the New Zealand fiber I played with this time is very similar to the fiber I played with from US producers. It's good to know that I'm comfortable with this wool and know what it will handle, and I'm pleased with my buying experience and product quality. These four points are probably the most salient ones, and in my opinion, comprise the entire "point" of sampling for retail products.

White Merino Wool: 21-22 micron, dyed with food coloring

Tuesday, January 21, 2014

Batt Photography: A History of Good and Bad Pictures

We collect thousands of images every day and some of those images stay in our permanent collection: our brains. When we lie awake in bed because we aren't sure if that guy likes us or not, we conjure images of him smiling and being near us.Those in retail understand the power of a product display. For example, there is a display showing us a young 20-something mannequin wearing business separates and standing in a powerful, yet seductive pose. We try on (and buy) those separates and matching accessories because we want to look as good as the mannequin. When we're at home, we try on all of the clothes and accessories and arrange ourselves to look like the image of the mannequin at the store.

But then the internet was invented. And we began posting pictures of ourselves and e-commerce came into existence. Then began the struggle for us to not only learn how the internet and e-commerce works, but we also needed to actually learn how to use our cameras. Those who chose photography as a hobby or career already had a leg up on the rest of us. We knew that family-photo-around-the-dinner-table wasn't going to do our products justice, but we used it anyway. Until about 2006, photos on the internet were so-so. The digital camera explosion didn't come until around then. I remember getting my first digital camera around Christmas 2004..and that's the one I used for taking photos of my products in 2010.

The following post is a tongue-in-cheek mockery of my once 'pretty good' pictures. It's fun looking back at old pictures to see how far you've come. The pressure to keep photos interesting, high quality, and remarkable is ever-present for businesses. And doubly so for the small business (we do everything ourselves and we often don't have the right tools for the job). That said, a halfway decent camera, a lightbox, and some tips about composition and you'll have gorgeous images worthy of being curated in our permanent brain collections.

Originally posted on January 30, 2013:

Alright, let's face it. I'm not a photographer. I'm only as good as my camera, and my first camera was terrible. It was a digital camera which was already 5 years too old when compared to modern models. I built a light box to keep my pictures from sucking a big lemon, but as you can see from the picture below, it sucked a lemon anyway:


Okay, so that's not a picture of a batt. I didn't have a drum carder when I first started, so I didn't sell batts when I first launched. However, the dyed tussah silk lying limp and dull in front of the wine is what I had to photograph with my horrible digital camera. Don't worry, that wine has long been consumed. Waste not for the sake of picture taking. And the glass? A present to my husband for our first year anniversary--while we were still dating. Cute, huh? Clunky looking, but sturdy. I drop everything. And I trail off on tangents...

Pity the tussah. Also, pity the lost potential. I could have done a much better job presenting the materials in my pictures to make them mouth-watering, though a little fuzzy. I mean, I researched the photographs of other fiber artists, but I also had to balance what I wanted with what I was capable of doing. Which wasn't much.

I called out to my facebook friends to see if I could scam a better camera, and luckily, I was offered an excellent camera for sale instead. I bought a Canon Rebel for an embarrassingly cheap price (thank you amazon.com for your low-ball pricing schemes!), and thus began my entire photograph revamp. And only 2 months after I initially launched. I had just taken all of my pictures, and here I was doing it all over again. But, the results were much better:


Oh yes, I was an instant pro. My old digital camera had its battery compartment emptied and sealed in its eternal tomb after I had this photo session. What stunning photos I could take now! I was zooming in like crazy to get ultra detailed shots of the individual fibers. I was essentially taking glamour shots of my products, and they certainly played up the star role.


Even my yarn got to take center stage. Now I could be like everyone else I had admired up to this point. However, I still had one problem. Though I could take accurate and clear pictures, I still was unable to capture that Je ne sais quois. Did I get the French right? It's been a while. Here are some more attempts I made to photograph batts:


I went back and looked at what others were doing more recently with their batt photos. I realized that photography for batts had reached a new level of sophistication. And that also meant rolling up the batts in a different way. So, I headed back to the table with batt in hand and snapped some shots from a new perspective:


Ooo, nicely done! What gorgeous colors and textures, and even the rolling of the batt impacts the ultimate outcome of the picture too. I have triumphed--for now. My goals for the near future are to begin taking pictures of the batts in new ways and be a trendsetter rather than a season-late trend follower.


I'm trying to focus on one feature of the batt, as in this example where I zoom in on the pulled sari silk which is off-center. I like how the rest fizzles into a clump of sparkly orange without concrete definition.


Or in this example where the folds are stacked on top of one another.


Or this one which is essentially a tube a fiber and only a small section in the middle of the fiber is in sharp focus. Whenever I sell the fiber, I'll surely post "normal" pictures, but for that eye-catching, wheel-whetting impact, I think I may be on to something. Time shall see.

Update: January 21, 2013

I wanted to show you another idea I had for taking pictures of multiple batts. I sometimes make limited edition batts where there are between 2 and 4 in a collection, but they aren't repeatable. I think it really points out how consistent I am when I make batts! :)


Thursday, January 16, 2014

Defining 'Art Yarn': What are We Really Talking About?

The other day, I posted on Facebook that I am torn. I want to sell handspun yarn in my Etsy shop, but traditional handspun just doesn't sell well there. It sells in spurts, but mostly it sells at fiber conventions and craft shows. Now that I have my new fiber tools (hackle and blending board), I want to start selling my art yarn. And there's the conundrum. I want products to sell, not hang around in my Etsy gallery. After reading some opinions of about art yarn, I realized that 'art yarn' can mean a variety of things. I mean, I already knew that it was a catchall term for all non-traditional, novelty-style yarns. But what are we really talking about when we say 'art yarn'?


In the last probably 10 years, 'art yarn' has stormed the spinning scene. Lots of people have begun spinning because they were inspired to make those fabulous 'art yarns' they saw in magazines and at conventions. I can't blame them! How many kids watched Bob Ross paint beautiful landscapes and wanted to become an oil painter? 'Art yarn' is inspiring, artistic, a statement, and even transcends its intended purpose. 'Art yarn' has moved beyond the concept of yarn and entered a realm of 'meta-yarn.' We can identify it as a thread which can be looped around a needle and formed into a fabric, but in some sense, it isn't functionally yarn anymore (as indicated by 'art yarn' being curated by art museums, thereby restricting its functional use to being solely art).


But not all 'art yarn' is created equal. While some yarn borders on 'meta-yarn' and becomes an accession with a catalog number, box, and database entry, what about the other 'art yarns?' Well, that's fuzzy, but also clear-cut. When you first look at a hundred pictures of 'art yarn,' you see a mass of crazy uncarded fibers, utilitarian add ins (like nuts and metal springs), and yarn so thick you might consider it rope. If you look at each 'art yarn' individually and mark down their characteristics (single/plied; beaded/unbeaded, natural components/man-made components, smooth/chunky, etc.), two distinct types emerge: a yarn which has strikingly similar characteristics to traditional yarn (but isn't traditional yarn), and one which defies everything we thought we knew about yarn.


In the first category, I'm talking about yarn which has some exaggerated attribute which makes it non-traditional. For example, thick and thin yarn is an exaggeration of a handspun yarn which isn't spun perfectly even. Even the simple addition of pulled silk to create textured bumps will force a traditional yarn into the 'art yarn' realm. The 'art yarns' which fall into this category are yarns which can be used similarly to traditionally spun yarns. You can make shrugs, skirts, mitts, and more with these slightly exaggerated yarns. You can even use patterns designed for 'normal' yarns with this 'art yarn' just by making a few minor adjustments.


In the second category, no holds-barred. Practically anything goes with this type of yarn, and it's such a freeing experience. Sure, you can get extreme versions of the first category, including super thick and thin yarns and giant silk 'cocoon' slubs. Most of the yarns which fit into this category won't be suitable for 'normal' patterns, even after making adjustments. There are several books on the market which cater to these artistic creations and have patterns specifically designed for these works of art.


I propose a way to distinguish these two types of 'art yarn' without diminishing their amazing qualities as statement pieces. I'd like to call the first category 'Tame Yarn.' I'm imagining a wild beast, full of predatory instincts and majestic beauty...all squeezed down into the tiny, compact body of the House Cat. Anyone who has ever seen a cat knows that behind those eyes of complacency lie the inner desires of a ferocious feline...the desire to attack that string until it stops moving. In a sense, you have a domesticated 'art yarn' in the first category. The point of this metaphor is to describe how the first type of 'art yarn' fits within our traditional notion of handspun yarn. Going from being a family without a cat to a family with a cat is a minor adjustment. We add cat food and kitty litter to our grocery list. For some of us, it's an easy way to dip our toes in the whole animal care business. Maybe if this goes well, we'll buy a farm and twenty sheep. You get the idea.


I think the second category should be called 'Wild Yarn.' And for this, I mean the epitome of King of the Jungle, Mr. Lion himself. He's the perfect balance of strength and relaxation, rigidity and flexibility. This category of 'art yarn' can add in structural elements like wire and suddenly we can't wash this yarn. It can also add in pieces of recycled cloth and cut felt. It can be softly spun and felted together. It can be spun tightly and coiled onto another yarn. This 'art yarn' can be just about anything yarn isn't normally. It demonstrates the incredible abilities inherent in wool and showcases the ways in which it can be worked as a medium by artistic hands. It's your imagination come to life, and every idea you have can be boiled down to materials and construction. Essentially, it's the embodiment of yarn as art.


I wanted to take a quick moment to clarify something. In no way is one category inherently better than the other. They both have their merits, their uses. But each serves a different purpose, I think. The 'Tame Yarn' can be used by those who are trying to figure out how to incorporate 'art yarn' into their current corpus of skills. It can be used by those trying to break out of the mundane and add in something fun. For the 'Wild Yarn,' it speaks for itself. You use this yarn to trail blaze, to boldly go where no artist has gone before. In the end, all fiber creations can intermingle. It wouldn't be unheard of to incorporate a traditional yarn with 'Tame Yarn' tactics (a 2 ply yarn with locks plied between them), or a 'Wild Yarn' with in-line weaving.


I can't say it enough: Wool has billions of possibilities and it can never truly be ruined. No matter which category we're referring to, the yarn speaks for itself. All 'art yarn' makes a statement, whether it be subtly or bombastically.

Sunday, January 12, 2014

My New Princess Kromski Minstrel Wheel!

It's been a year and a half since I got my lovely princess wheel, and thanks to a fan over on facebook, she now has a name. Meet Beth, short for Elizabeth, and daughter heir to the Throne of Wool. Fitting, no? :)

Originally posted on September 1, 2012:

You know that feeling you get when your package is taking_forever_to get to your house and when it finally arrives, you flip out with excitement? And it doesn’t have to be a huge package, or anything expensive either. This little smile creeps over your face and then explodes into a huge grin, teeth showing and lips spread wide, and then you do this embarrassing little dance that you never perform outside of your bathroom. Well, that was me when my new Kromski wheel showed up at work the other day. Yeah, I squeed like a 5-year old girl and did the embarrassing little dance in front of 15-20 people. But before I talk about my cool new wheel, I’d better catch ya’ll up on the recent events since we moved to Korea.

Before we left the US, we carefully packaged and labeled 6 boxes of personal items we wanted to have shipped to Korea. We worked out the math, and it would be hands-down far cheaper to ship it than to buy it while in Korea. So, we measured out the stuff we use all of the time and stored all of the rest. This boiled down to shipping over our computer and gaming systems, movies, books, fiber, spinning wheel, and drum carder. We shipped it the day we left on the plane (July 9), and the boxes arrived in Korea on July 12. I was surprised at how quickly they got here. Then, we got 6 letters from customs, which were entirely in Korean, that needed to be filled out and faxed back to them within 15 days. We had it “translated” by the HR at our work, then we filled them out and faxed them back. Then we waited. Then I asked a coworker how long before packages are usually delivered from customs, and he told me “about a week.” So we waited. Then we waited some more.

Now, all women have this little alarm that goes off in their brains when something feels wrong, and this is about when my alert button sounded the alarm. After 3 days of asking questions and actual translators helping us out, we figured out why it was taking so long to get our stuff. One of the boxes on the form we originally filled out was roughly translated to mean something like ‘this is our personal stuff that we will take back home when we leave the country.’ So, it made sense to check this box. However, what it actually means is ‘send this stuff back to sender.’ Well, that meant that we sent everything back to the US. I wish I could say it was so simple as waiting for it to arrive and then ship it back.

When our stuff was first shipped here, we paid for Priority International. To ship it back from customs (like we did on accident), no one was paying for the shipping. They shipped it via the cheapest means possible, which meant that our stuff was going back on a slow boat--probably a freighter barge. Our stuff left here on July 20, and of course we didn’t figure out the problem until July 28. Customs predicted that our stuff would arrive back in the States around early to mid-October. OCTOBER!! That is an eternity when you’ve been fiending for some fiber and something to spin it on. And because I had just bought a bunch of new work clothes before leaving, I didn’t even pack a spindle.

So, when we got our first paycheck from work, I immediately went online and decided to buy a new wheel. My Babe wheel has served me well for the last year and a half and has helped me spin a ton of yarn, I just couldn’t wait another 8 weeks for it to arrive at the in-laws’s house. Now that we have real jobs and aren’t trying to exist on a grad student income (which we did for 6 years), I decided, “Heck with it. I’m gonna buy me a sexy wheel!” Of course I didn’t phrase my desire quite like this, I think I ended up saying, “This wheel has a different tension system--single drive versus double drive--with different wheel ratios, so I should get this one so I can study the different ways to make yarn.” Heh, well this is all true, but I really wanted a princess wheel.

As soon as I got it home, I ripped open the package and set to work putting it together. Who cares about being hungry when the prospect of making yarn is only an hour away? It was super easy to put together (about an hour for both the wheel and the matching stool I bought separately), and I wasted no time digging out the fiber I just bought.

Without further adieu, I shall introduce you to my new wheel. It’s a Kromski Minstrel with a mahogany finish. It was two tension options, one of which is scotch tension (single drive) and the other is double drive. I was confused about this at first until I had the chance to actually use one, so a double drive just has a drive band that runs around the wheel twice and goes over the whorl and bobbin each once. Confusing? Perhaps I’ll take a video of that in action. :)


Isn’t she beautiful? I totally get how people who have antique wheels have a whimsical-like experience every time they pull their wheel out to spin. I started working on some woolgatherings bfl/firestar blend that I talked about in my last post. I didn’t have a leader, so I just made a real quick leader by hand (perhaps I’ll show you how to do that too--it’s super easy to do) and tied it to the bobbin. From there, the rest is history!


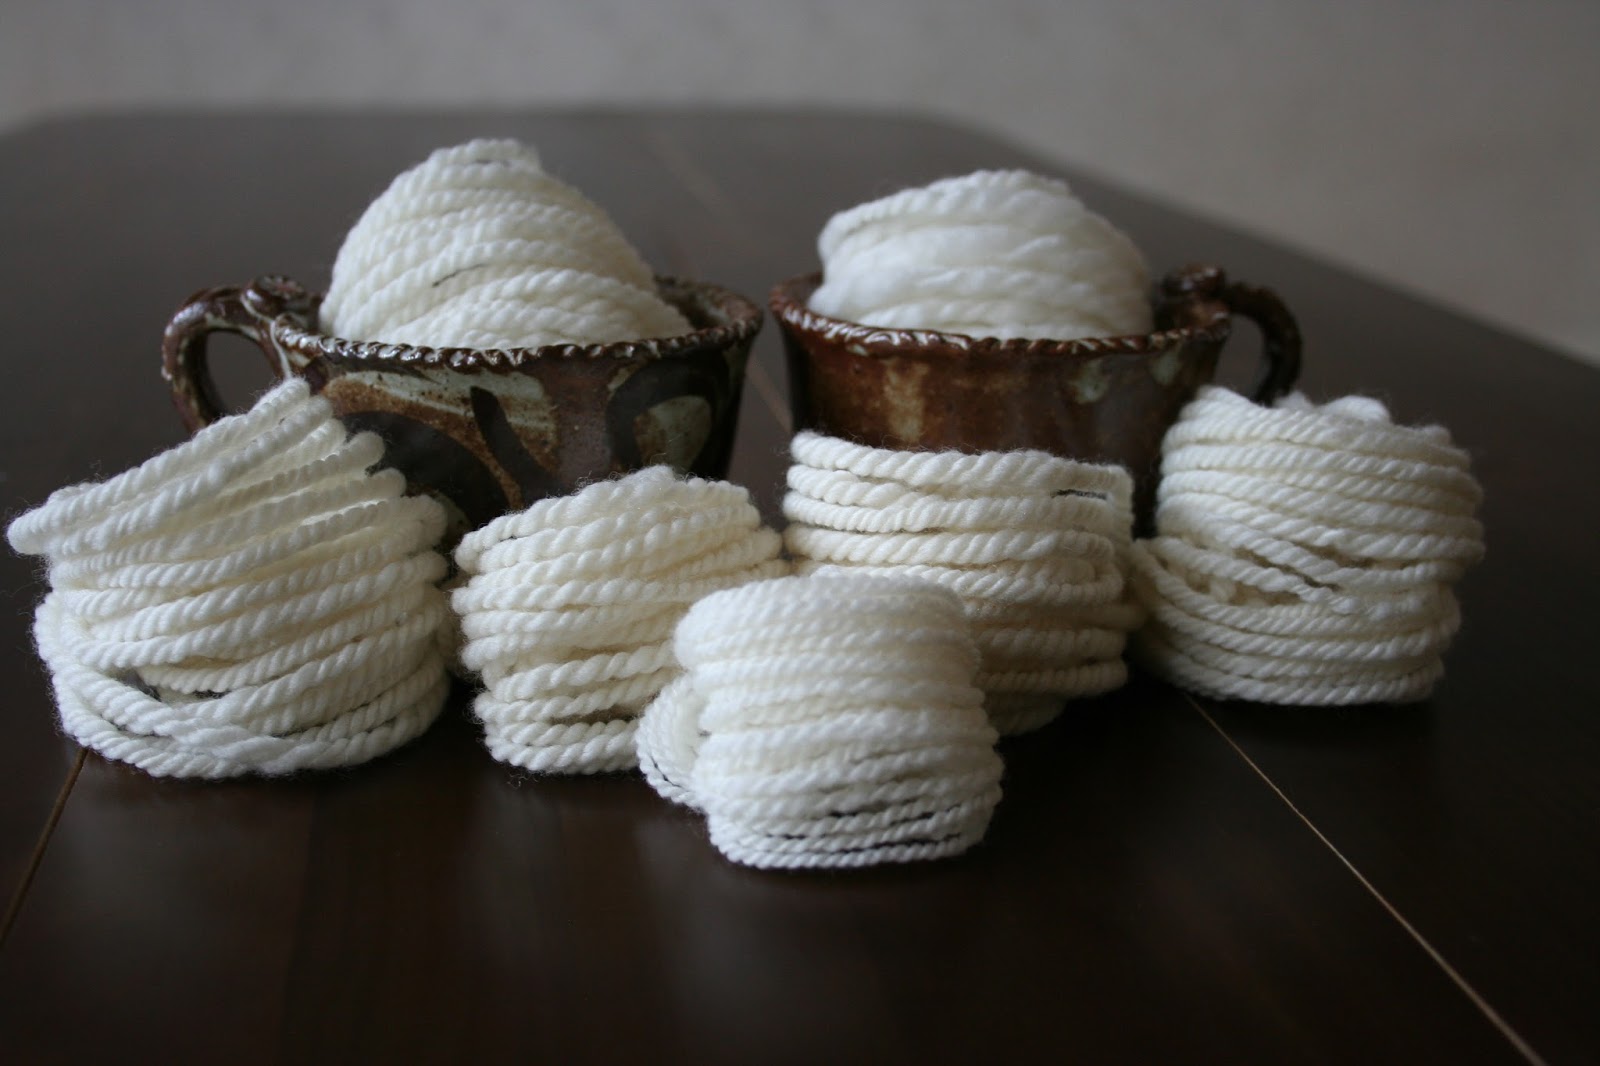
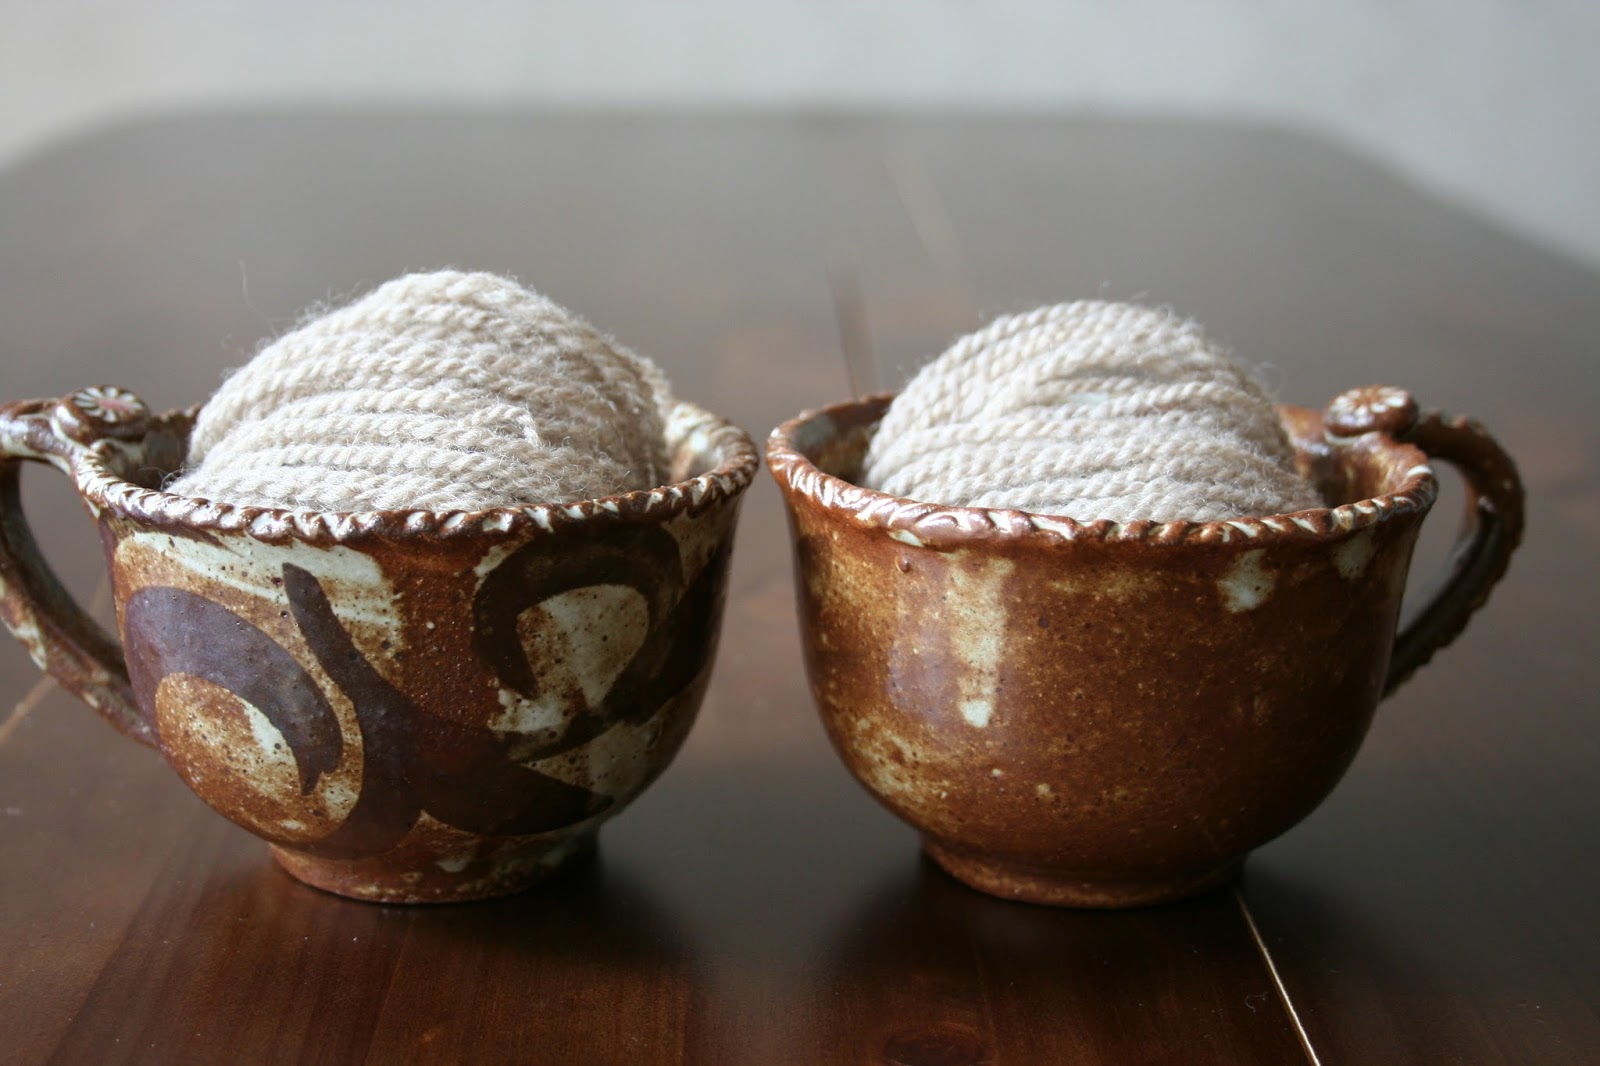
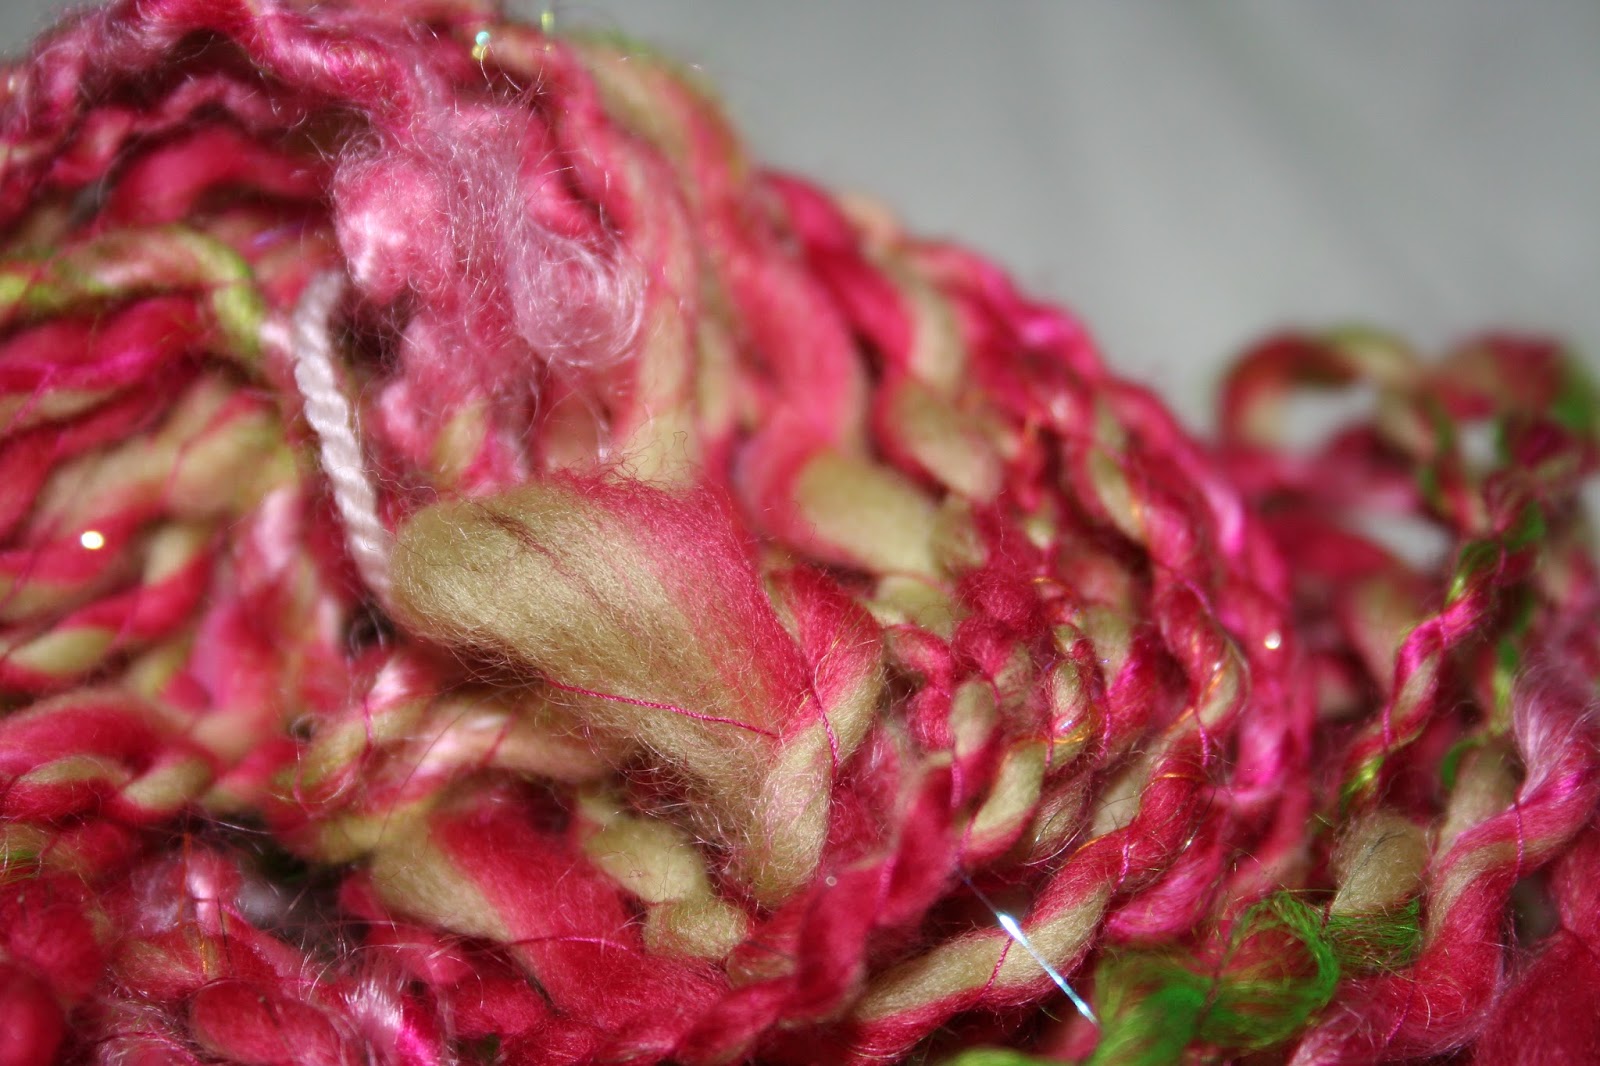
I’m looking to turn this into a 3-ply fingering weight yarn for a new shawl. I have 8 ounces of this fiber, so I might be able to do a shawl and something else. Here is the polwarth/silk blend spun up and plied:


Last thing. I started uploading videos to my YouTube channel, which I meant to start uploading videos to back in October last year. I plan to use it as a vlog about crafting and living in Korea, and I’ll hopefully be adding in tutorials and how-tos about spinning, drum carding, and whatever else. Be sure to subscribe to my channel so you never miss a video. If you want to see something specific, let me know about that too!

Wednesday, January 8, 2014

Fabulous Fibers from WoolGatherings on Etsy!


I had been watching the fiber in this shop since forever ago, so it was high time to buy some fiber from them--and I'm totally glad I did! I still have one braid leftover from this hoard, so I should probably drag it out of storage and play with it. But what to make? Hmm...

Originally posted on August 28, 2012:

I’ve been eye-balling the lovely colors from woolgatherings. I bought some, since hubby needs a new scarf, right? Yes, of course he does. I went all out on the textures, and I bought silk, camel, bfl, firestar, and polwarth. Yep, a little overboard, but that’s okay. It’s supposed to make me feel like I’m back home, right? I ended up buying 7 braids in all, some of which were true luxury blends! And now, some glamour shots:


This one is going to turn into either a lovely, full-length shawl (or maybe a stole), or it will be a beautiful, chunky cabled scarf. The colors really pop in this colorway, and with the shimmer from the firestar, I think it would look really fantastic. The fiber content is 70% bfl and 30% firestar:


 The one of the left in this picture is a luxury blend of 40% camel, 40% merino, and 20% silk. I think I’ll either make a lacy scarf with this, or I’ll make some beautiful mittens (my mittens of 5 years just bit the dust at the end of last winter). The fiber on the right is 85% polwarth and 15% silk. I’m not sure what this one will turn out to be...


 The braid on the right in this picture has the same contact as the one above on the left, 40/40/20. This one has a lovely greyish purple and sage green combo. I’m not too sure what to do with this one either.


 Finally, this one is a combination of 80% black alpaca and 20% cultivated silk. It is such a stunning color, and is exactly the reason why hubby wanted it. He’s getting a new scarf, and it’s gonna be made out of this. I bought two braids for a scarf, so I can either go with chunky or thin, depending on the pattern I choose. Do you think it might look okay knit up into cables? I’d like to expand away from my usual rib or seed stitch patterns for him. :)


For all of the growing excitement I’ve been having for some fall colorways, I didn’t buy any this time (maybe the polwarth braid comes close?). You’ll have to wait to see what I packed to have shipped over here. It won’t be here until mid-October.

Thursday, January 2, 2014

Free Yuna Shrug Knitting Pattern

I really love wearing this shawl/shrug, and I really want to make a second one in a different color. As part of my fleece processing video series, which you can find on YouTube, I'll be walking through a video tutorial (and here, a phototutorial) on how to make this shrug from fleece to finished item.

For now, any handspun or bulky yarn you have in your stash will be suitable for this pattern. Just know that I'll post some companion videos in the future, just like I did for the Cora shawl pattern!

Originally posted on May 8, 2013:

Okay, so I finally got around to taking some glamour shots of the Yuna shrug. I was planning to release a new pattern once a month, but as some of you may know, I was sick for essentially the entire month of April. Better late than never! Remember, I will be posting special offers for my Etsy shop which will only available to my Facebook and Twitter followers. So...go there and collect on the deals!


I LOVE how simple this shrug is. Gauge isn't super critical, so you can definitely make Yuna if you're still new to knitting. This is also great for knitters out there who have arm and hand issues (for example, anyone who has carpal tunnel syndrome or arthritis) because you can hold the yarn a little on the loose side. And if you're getting ready to be scared that this pattern has cables, relax--I'll post up a tutorial video in about a week to show you how I made this shrug.


Last, I'll be republishing my sleek cabled fingerless mitts pattern. This one isn't for free, but I will be adding notes (and making a couple of typo fixes!) for using handspun yarn. I didn't realize this when I first made the mitts that they're actual quite handsome when worn by a guy. Mr. IT Guy wore them for the photo shoot, and he looks so GQ. :D


Here's the pattern link: Free Yuna Shrug Pattern Download

P.S. I'm sorry I haven't posted much lately! I'm doing vlog videos instead, since I have the ability to really explain what I'm talking about..doing it here would mean writing a book every day. I just don't have that kind of time! There are mountains to climb and rivers to cross. Gotta get out and see Korea sometimes. And if you want to see pictures, they're usually posted up on FB in a timely manner. Be back soon!